
KindleX 咪咕 折腾笔记
KindleX 咪咕 折腾笔记
引言
机子太古老了,以前折腾过就放着吃灰了,突然想起,便拿出来看看,发现以前的教程也没有了,也忘记一部分操作,遂记录一下。其实折腾后也没什么区别。
注:此教程仅开启ADB与安装第三方应用。文档文件存放于https://github.com/Angels-Ray/Kindle_X_Migu
设备
- Kindle 8 系列下的 Kindle 咪咕,型号
SY69JL。 - CPU:
iMX6 - 系统: Android 4.4 (或许)
- 存在 Bootloader 锁与 uboot
- 存在 串行接口,波特率
115200
分析:设备是Android,与传统的Kindle的Linux系统不太一样,略显奇特。默认是不开启ADB的,同时也开启了Selinux的严格模式。Uboot是有启动校验的,不能刷写其他uboot。也存在Booloader锁,记得 @Ygjsz 说过,似乎修改某个启动判断是可以绕过启动校验,刷写其他系统(此教程无刷第三方系统)。
折腾记录
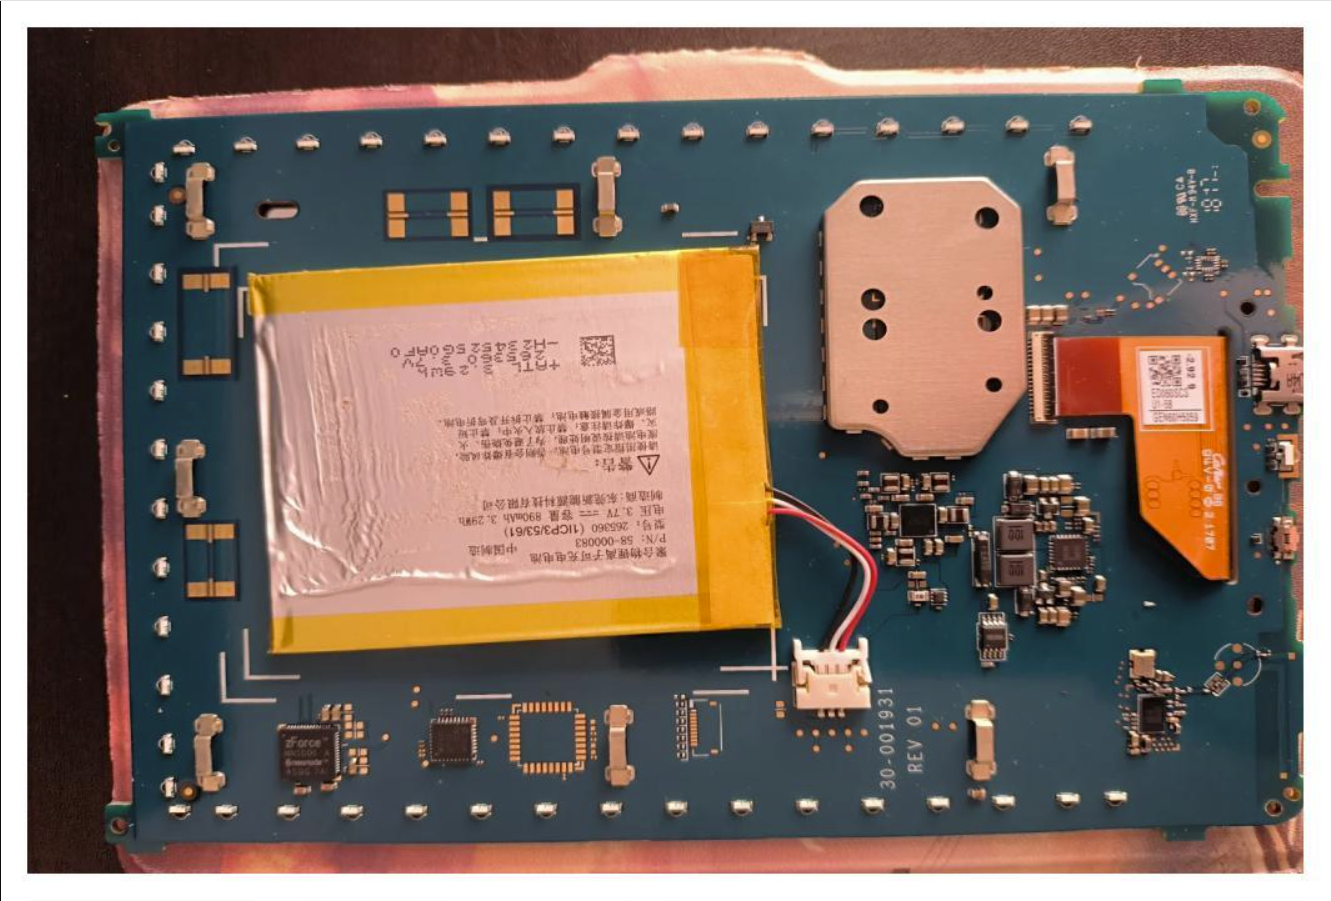
引出串口
先把外壳拆掉,拆开外壳后,(正面)有一个黑色遮光罩用黑胶与屏幕粘连(与触控相关),注意遮光罩有两个角有凸起,防止弄断。
背面有串行接口,需要引出
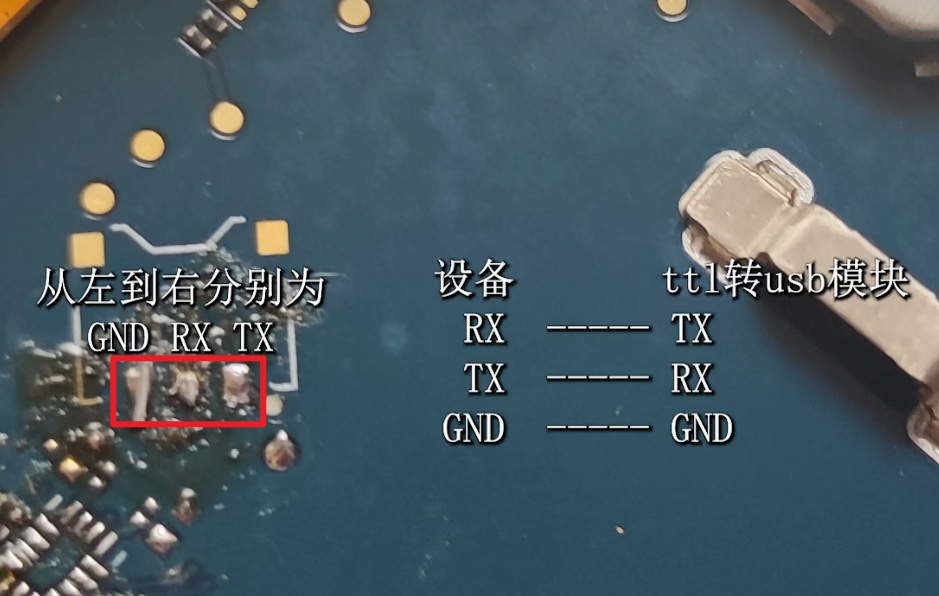
设置Uboot环境变量
使用TTL转usb工具连上电脑,重启设备,按任意键打断启动系统,进入uboot

查看原版的uboot环境变量
uboot > printenv
baudrate=115200
boot_fdt=no
bootcmd=mmc dev ${mmcdev};if mmc rescan; then run testboot; fi;
bootdelay=1
fastboot_dev=mmc1
fdt_high=0xffffffff
initrd_high=0xffffffff
loadaddr=0x80800000
mmcautodetect=yes
mmcdev=1
mmcroot=/dev/mmcblk0p1 rootwait rw
setmmcdev=mmc dev 1 0;
splashpos=m,m
testboot=echo BOOTing from mmc ...; booti mmc1设置启动参数(bootargs),如果需要刷 @Ygjsz 的系统就需要把bootargs清空
setenv bootargs 'console=ttymxc0,115200 init=/init androidboot.console=ttymxc0 consoleblank=0 androidboot.hardware=freescale androidboot.selinux=permissive uart_at_4M androidboot.serialno=G000MR03752405NF androidboot.unlocked_kernel=false androidboot.prod=1'设置启动命令(bootcmd)
setenv bootcmd 'mmc dev ${mmcdev};if mmc rescan; then fuse override 4 6 0x00000020; run testboot; fi;'保存环境变量后重启到系统
saveenv
fuse override 4 6 0x00000020
reset
详细日志:
uboot > setenv bootcmd 'mmc dev ${mmcdev};if mmc rescan; then fuse override 4 6 0x00000020; run testboot; fi;'
uboot > setenv bootcmd 'mmc dev ${mmcdev};if mmc rescan; then fuse override 4 6 0x00000020; run testboot; fi;'
uboot > saveenv
Saving Environment to MMC...
Writing to MMC(1)... done
uboot > printenv
baudrate=115200
boot_fdt=no
bootargs=console=ttymxc0,115200 init=/init androidboot.console=ttymxc0 consoleblank=0 androidboot.hardware=freescale androidboot.selinux=permissive uart_at_4M androidboot.serialno=G000MR03752405NF androidboot.unlocked_kernel=false androidboot.prod=1
bootcmd=mmc dev ${mmcdev};if mmc rescan; then fuse override 4 6 0x00000020; run testboot; fi;
bootdelay=1
fastboot_dev=mmc1
fdt_high=0xffffffff
initrd_high=0xffffffff
loadaddr=0x80800000
mmcautodetect=yes
mmcdev=1
mmcroot=/dev/mmcblk0p1 rootwait rw
setmmcdev=mmc dev 1 0;
splashpos=m,m
testboot=echo BOOTing from mmc ...; booti mmc1

Environment size: 643/8188 bytes
uboot > fuse override 4 6 0x00000020
Overriding bank 4 word 0x00000006 with 0x00000020...
uboot > reset
开启ADB
进入系统后,开启工程模式即打开usb调试
touch /data/system/FACTORYMODE
reboot
安装第三方应用
悬浮窗 easytouch.apk
启动器 eink_2icon.apk
启动悬浮窗 adb shell am start -n com.shere.easytouch/com.shere.easytouch.ui350.MainSplashActivity
隐藏状态栏 adb shell settings put global policy_control immersive.navigation=*
其他ADB命令
adb shell pm list packages
停用:adb shell pm disable-user 包名
启用:adb shell pm enable 包名
卸载:adb shell pm uninstall --user 0 包名
SSH
adb没有root权限,但是可以安装dropbear以远程ssh,那么就有了root权限,无密码
adb push ssh /sdcard/ssh/mount -o remount,rw /system
cp /sdcard/ssh/dropbear /system/xbin/dropbear
cp /sdcard/ssh/dropbearkey /system/xbin/dropbearkey
cp /sdcard/ssh/scp /system/xbin/scp
cp /sdcard/ssh/ssh /system/xbin/ssh
chmod 755 /system/xbin/dropbear
chmod 755 /system/xbin/dropbearkey
chmod 755 /system/xbin/scp
chmod 755 /system/xbin/ssh
mkdir -p /data/dropbear/.ssh
chmod 644 /data/dropbear
chmod 644 /data/dropbear/.ssh
#生成密钥
dropbearkey -t rsa -f /data/dropbear/dropbear_rsa_host_key
#生成密钥
dropbearkey -t dss -f /data/dropbear/dropbear_dss_host_key
#建立用的环境变量
echo >> /data/dropbear/.profile "PATH=/sbin:/vendor/bin:/system/sbin:/system/bin:/system/xbin"
#建立用的环境变量
echo >>/data/dropbear/.profile "export PATH"
#做目录快捷方式
ln -s /data/dropbear /etc/dropbear
dropbear -V
# 公钥
# cp /sdcard/ssh/keys/authorized_keys /data/dropbear/.ssh/authorized_keys
# chmod 600 /data/dropbear/.ssh/authorized_keys
cp /system/bin/set_time.sh /system/bin/set_time.sh.bak
vi /system/bin/set_time.sh
# 添加: /system/xbin/dropbear -v
mount -o remount,ro /system恢复
SSH
mount -o remount,rw /system
rm -rf /system/xbin/dropbear
rm -rf /system/xbin/dropbearkey
rm -rf /system/xbin/scp
rm -rf /system/xbin/ssh
rm -rf /data/dropbear
rm -rf /etc/dropbear
cp /system/bin/set_time.sh.bak /system/bin/set_time.sh
mount -o remount,ro /system
Uboot
setenv bootargs
setenv bootcmd 'mmc dev ${mmcdev};if mmc rescan; then run testboot; fi; '
saveenv
reset本文系作者 @ATRAY 原创发布在ATRAY站点。未经许可,禁止转载。

暂无评论数据